Introduction


My name is Phoebe Hung and my candidate number is 8017. I completed brief 1: music industry. I worked with Georgina Harper-Dennett (8720) and Gabriel Meytanis (8560). To see my work, please click on the 3 labels on the right named A2 Research and Planning, A2 Construction, and A2 Evaluation.

This is our music video

This is our music video. Please view it in 1080p for optimal experience.

My Music Video

Front digipak text

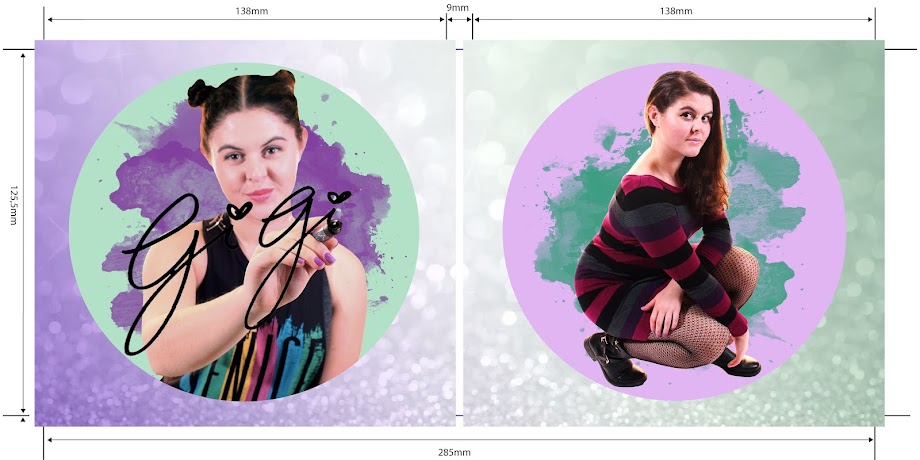
These are the front panels of our digipak album cover:

Digipak front cover image

Digipak front cover image

Inside digipak text

These are the inside panels of our album digipak:

Digipak inside cover image

Digipak inside cover image
Our website:

Please click on the image below to enter the site


Wednesday 3 February 2016

R&P post 20: Reflections so far/ looking ahead

Reflections so far

We have completed a lot in a short period of time. I think that the main reason as to how we did so much is that we divided the labour between ourselves and took on jobs that we specialised in most. This meant that we all took a leading role at one point or another during the process. Olamide wrote many versions of the script and took the directing role for the conflict scene so that it would be exactly how she envisioned it. Georgina does drama and so she acted in our sequence as one of our bullies. Alex makes go-pro videos in his spare-time so we used his go-pro for two shots. He was especially skilled in editing and used his own knowledge to improve the quality of our work. I, personally, did a lot of research and made mood boards and provided reference points for the group. I enjoyed teaching Georgina, who was not used to the technology, things like framing and how to film shots and how to edit shots using Adobe Premiere Pro.

Looking back at the test shoot, I think that we did well to overcome the problems that we faced. We did well to shoot and edit our sequence so as to minimise the effects of our mistakes. The main issue that we had was when the power went our during our shooting but that was unavoidable and would be unlikely to happen again.

Looking ahead

We will have two more shoots and two more editing weeks. I am confident that we will complete our project and will do well to avoid mistakes that we made before.

R&P post 19: Our rough cut

Our rough cut was a good guideline for our final opening sequence. We were able to identify sequences or shots that went well and play around with different editing techniques so that we could use the perfect one in our final cut. As well as cutting down shots and ordering them, we also graded the shots of the sun on the lake and added motion titles over the b-roll. Whilst editing our sequence, we kept in mind continuity theories such as the 30 degree rule, varying shot types and match on action.

The rough cut also allowed us to view how the visuals correlated with the voiceover and the music. Since the animatic was only comprised of still photos, we could not judge how the action would appear. The rough cut was extremely useful for this and we were able to discard the shots that did not go with the voice over as well as identifying some of the improvised shots on the day.

This is our rough cut:


A problem that we identified was that the confrontation scene was not quite right as we hadn't followed the script and this lead to continuity issues. For the main shoot, we resolved to stick to the new script that Olamide made and to film the scene all the way from different angles so that we could edit them together seamlessly.

I made a list of things that we should improve on for our next shoot and any changes that we made to the storyline.

Feedback from our rough cut

Our target audience were not keen on the voice over which they pointed out was very monotonous and that the person sounded depressed or even suicidal. This was not the portrayal of David that we wanted. Although he was introverted, we wanted him to sound sarcastic and talk in a more light-hearted manner.

One thing that our target audience liked was the shots of the lake and the 180 degree arc around Craig.

We learnt a lot from editing the rough cut. I am quite proud of the work that we have done as a group. Overall, I think that it was very successful and we did well despite the problems during the shoot.

R&P post 18: Our test shoot

The purpose of our test shoot was to experiment with our ideas and to have an idea of how the final product will look like. We made several mistakes during the test shoot but we hope to avoid making the same mistakes in our real shoot. Alex kept note of any issues that arose during the shoot so that we could be better prepared next time.

Before we even began shooting, members of the group met up at the wrong place and later than the time that we had agreed. Our actor also arrived an hour later than the agreed time which meant that we couldn't shoot the shots with the actor. This issue was due to a poor communication, between the group members and the actor, which we aim to improve on. However, we used the spare time to shoot the aesthetic shots that did not require the actor, such as the sun across the lake and the leaves on the trees.

Another problem was that while we were in Alex' house, a socket blew and the whole house lost power. Most importantly for the shoot, we had no lighting. We resolved this by changing the shots so that the actor was positioned near the window so that we could make use of the natural lighting. However, it was late afternoon in winter, so we were aware that the sun would go down soon and we didn't have much time to film. In the end, we finished filming on time with relatively well lit shots.

Holding the clapper board

Balancing act
Filming precariously on the top of a levee


We encountered many problems during our test shoot. Whilst we might not have ended up with our ideal shots, I think that our shots are satisfactory and we dealt with the issues as best as we could. Our experience enables us to prepare better for our main shoot and I am confident that we can solve any problems that may arise.

R&P post 17: Our planned costumes, hair and make-up

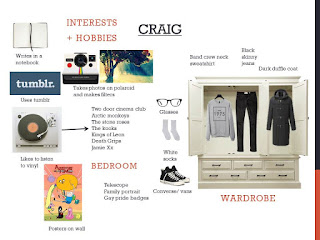
The characters' costumes, hair and make-up were crucial for characterisation. I created a costume list so that we and the actors could have a clear idea of the character's appearance which would reflect on how the actors acted it out.

Earlier on in the research process, I had created a moodboard for Craig, including the type of clothing that he would wear.


I modified the moodboard to create a fully detailed costume, hair and makeup list. I divided the table into columns so that you could clearly see the items of clothing that the character would wear, how the clothes affected the characteristics, reference points, and the actor as the character. I think that it was necessary for us to make decisions based on personality and characterisation, as well as letting the actors understand their characters to portray them accurately.

This is the revised version of the costume list that I made for our main character Craig:


I think that the costume list really brought the characters to life as we could imagine the characteristics simply through the connotations of clothing. We showed it to the actors so that they could study their characters and prepare the clothing in advance.

R&P post 16: Casting

Casting our actors for the characters was important as the actors needed to convey the character's personality effectively.

I created a cast list with a picture of the actors and descriptions of the characters that they would play.

We casted Reuben Woolley as the lead role, Craig. Reuben is a very capable actor who currently does A-level drama. He is very close friends with Alex and was willing to come to all the filming days. We chose him because he looks and dresses similar to our idea of Craig and we thought that he would best depict the characteristics of the main character in our film.

For the character, David, we appointed the role to Alex Brock who is another close friend of the Alex in our group. Our main reason for picking Alex was because he has a specific style that we envisioned for the character David. As a group, we agreed that Alex Brock was perfect for the character and we even based some of David's traits and style off Alex. I used Alex's peculiar taste in fashion and his appearance as a base for David's costume and hair.

We had originally planned to have two male characters to bully David's character but we were aware that we did not have gender representation of females at all throughout the opening sequence of our film. Therefore, we established that Georgina would play one of the bullies. She does A-level drama and is really confident in acting. The character that we created would be called Shay and was based off the chav stereotype. Since Georgina is a very versatile actor, we had no doubt that she would do well.

For the second character, our initial idea was that he would be black so that we could have some ethnic diversity within our characters. We faced the issue that the bully would have negative connotations which might reflect negatively on his ethnicity as he would have been the only character of ethnic background amongst the actors. Rather than having negative ethnic representation, we decided to have our group member, Alex, play the character.

In the end, our cast worked well as it was easier to rely on our team members to act rather than face the possibility of being cancelled on by actors outside of the group. It also worked well for transportation as Georgina's and Alex's parents' cars could only fit a maximum of seven people.

R&P post 15: Our planned filming location/set design/props

Our planned filming locations

For the house scenes, we plan to shoot in Alex's house, which is located in East Finchley. For the nature scenes, we plan to shoot at Bowyer's Water, located in Hertfordshire outside of London.

Georgina took photographs of the area surrounding the lake and shared it with our group so that we all could visualise the setting and could, therefore, come up with ideas to suit a location. I made a gif of the photos that she took, which can be viewed below:


While planning our opening sequence, one of the first decisions that we made was that we would film at Bowyer's Water as it is located near Georgina and we all agreed that the lake and the forest offered extremely aesthetic scenery. We also decided to film in Alex's house as we needed interior shots to establish Craig's character in his daily routine and his living space. Despite being closer to the lake, Georgina's house would be too small to film in, which would affect the positioning and movement of the camera. It would also be hard to bring props and dress Georgina's room to look like one of a teenage boy's as we had a limited amount of time. In general, it would have been impractical to film in her house. Alex's house was large enough to film in and his room was already a typical teenage boy's room, meaning that we could easily bring props to enhance Craig's character.

Our set design and props list

Props - Craig's notebook
As a group, we decided on the props that we would use to bring out Craig's quirks and explore his interests. After establishing that Craig was introverted, we brought about the idea of the notebook, which Craig would carry around with him throughout the opening sequence. The notebook allows him to reflect and express himself in a way that he can't do with other people. We got vintage film posters and used a vinyl record player that Alex already owned to show Craig's artistic creativity. I think that the props that we used really reinforced Craig's personality and brought his character to life.
Using our group ideas, Georgina constructed a set list which incorporated props. It is organised in terms of location with a picture and description of the set. The props are identified in the last column, which we circulated around the group so that we could bring the props to the shoot.


Overall the locations, set and props that we used worked well for the aesthetics of our shoot. I think that a negative point is that we chose to film at the lake early in the morning so that we could catch the sunrise and have the optimum aesthetics for our shoot with the sun over the lake. We didn't take into account the temperature at that time of day so our group members and actors were freezing cold during the shoot. Despite this, we kept our morale up and had fun during the shoot.

R&P post 14: Our call sheet

We produced a call sheet to ensure that we are organised and so that our main shoot goes smoother than our test shoot. We learnt from the mistakes that we made during the test shoot and incorporated that into our call sheet.

We detailed exactly when and where the individual actors would start and finish, the contact details for our group member and a specific timetable that includes lunch breaks and travel. We also communicated directly to the actors and to each other about meeting times: Georgina made a journey planner directing the way to her house so that it would be easy for us and the actors to arrive there.

This is the call sheet that Alex and Olamide created:

If I were to redo the call sheet, I would put in a health and safety brief for the actors' wellbeing and I would conduct a risk assessment, especially since we were using expensive filming equipment and it was important that they didn't get damaged. I would also create a more developed timetable that would include short breaks to rest because this would give the actors and crew members incentive to finish on time.

R&P post 13: Our shoot-board

The shoot-board enabled our group to order our shots so that we could shoot more efficiently. Essentially, it is the order in which we would shoot on the day of filming, but not the chronological order of the finished sequence.

This is an example of how we constructed our shoot-board:
Our initial shoot-board for our test shoot

The four of us worked on a section each so as to complete the shoot-board quickly and methodically.

We grouped the shots into separate locations and sets so that we could shoot as much as possible without having to change camera framing or positioning. We produced our shoot-board by creating a gridded table, adding the photos of the post-it-notes and filled in the location, actors, props, and the proposed timings for each shot. We allocated the jobs of director, camera and sound beforehand because we thought that it would save time. However, this proved not to be the case as on the day, it was changed to save time during the shoot.

Our revised shoot-board for our main shoot


The shoot-board was essential to the planning process as it allowed us to manage our time; we appointed break times ahead of time and during the shoot, we could see if we were on schedule or not. Our initial shoot-board for the test shoot was revised for the main and back up shoots.

R&P post 12: Our animatic

We produced our animatic by taking live still photos of the events that would occur in our film opening. We referred to the drawings that we did on post-it notes for our storyboard, bearing in mind shot types and framing. We used Adobe Premiere Pro to add the shots to the timeline, cut them down with the razor tool, add music, voiceover and titles.

Our animatic:


The animatic made it easy to identify continuity errors which we corrected by adding new shots to make the sequence continuous. After viewing the animatic as a group, we made notes on what to change and also got feedback from staff that would improve continuity in our sequence.


Our target audience pointed out that it was very out of the ordinary for teenagers to be walking in the forest when typically, they'd be indoors on their phones. We decided that we would give our characters a sense of purpose when they are walking. For example, Craig has his notebook and wants to be alone and contemplate in solitude, David is just strolling through the park on his phone and the bullies are loitering and being loutish.

Overall, I found the animatic very useful. However, because it is composed of still shots, we could not convey the movement that we had planned for and so some shots linger for a longer time than is necessary.

R&P post 11: Our timeline and storyboard

Our timeline

We produced a timeline so that we had a fixed order of events. We took A3 sheets of paper and selotaped them together to form the base for the timeline. We split it into 3 sections for the video track, the audio track and the dialogue. In the video track, we noted down what visuals we needed to include, for example setting or character movement. Part of the process included blocking out the actions so that we could estimate how much time each action would take and how long the shot would be. For the audio, we marked down when the music track would begin and end, and when we would have the white noise effects. For the dialogue, we recorded how long it would take to read out the voice over and the argument. We then decided when the voice over would best go with the video and how the dialogue would fit with the conflict scene.

The beginning of our timeline

Our timeline
Our storyboard

To create our storyboard, we drew our shots on post-it-notes and stuck them on a large piece of sugar paper. We referred to the timeline for the order of our shots. As our work was still in progress, the post-it-notes allowed us to add new ideas and move the shots around until we were satisfied with the finished product. For our group, we came up with new shots often and had to revise our existing order. We had to add many new shots in order to keep a continuous flow throughout the film opening. Overall, I am happy with our group's work as we worked together well to propose more creative concepts although our end product was different from what we initially planned.

Georgina and I holding up the storyboard
The different colour for the post-it notes represent the shot type, taking into consideration framing. This makes it easy for us to identify the varying shot types, which is a typical convention in films.

The storyboard
Long Shot
Close Up

In my opinion, the storyboard was more useful than the timeline because the visuals were immediately clear. We knew straight away what type of shot and framing it was and we could easily redraw the notes replace shots we weren't happy with. Although I had put down exact timings for each shot in the timeline, our final product was very different in terms of the length of shots. Therefore, the timeline wasn't utilised to its potential and wasn't of much use to us.